# Step 4: Configure Your Twilio Account

### Before you start, note the credentials you'll need to save-keep to input into Postman:

1. account SID
2. API key SID
3. your secret key (*this is unretrievable once you proceed beyond this step, so make sure you have saved somewhere, or you will need to redo the set-up process to generate new keys*).
4. messaging service ID

### 1. Your Account SID

An account SID is the unique identifier assigned to your agency account, much like an NRIC number. This is immediately available on your dashboard once you log into your account console.

<figure><img src="https://4126954886-files.gitbook.io/~/files/v0/b/gitbook-x-prod.appspot.com/o/spaces%2F-MAQH3DF49Lq0AJudrbF%2Fuploads%2FWFQ12T2QXqr4qVQDryX4%2Fimage.png?alt=media&#x26;token=94c8bbd5-5acf-4793-8d3e-063e2491d57f" alt=""><figcaption><p>
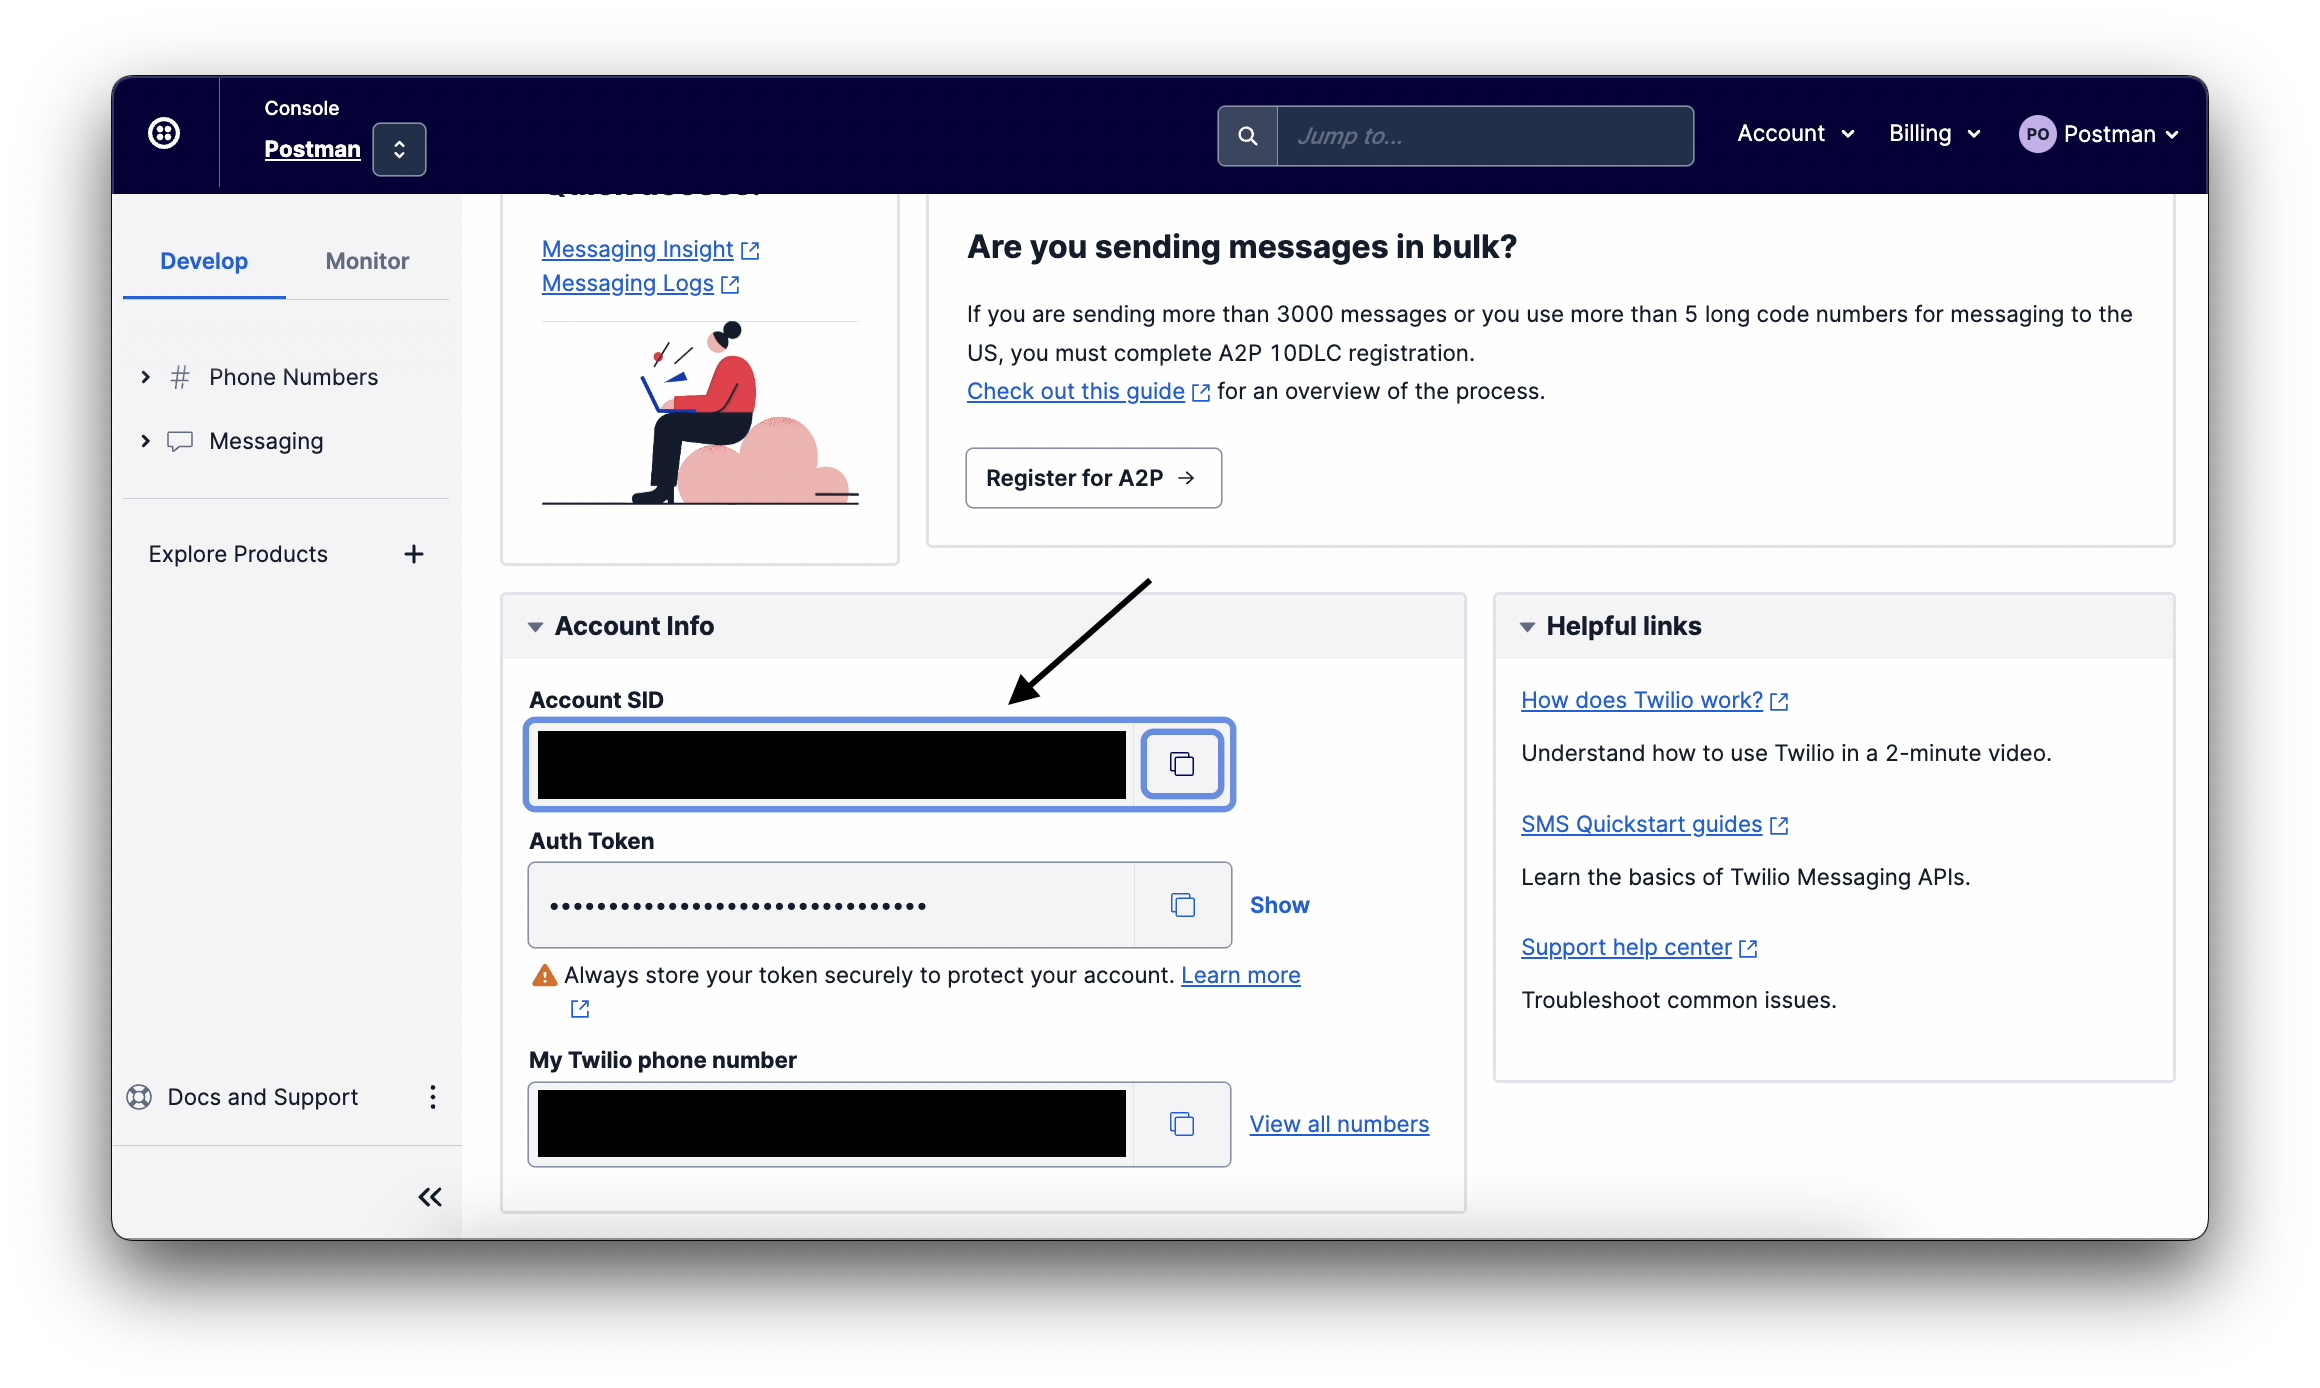
Locate your account SID
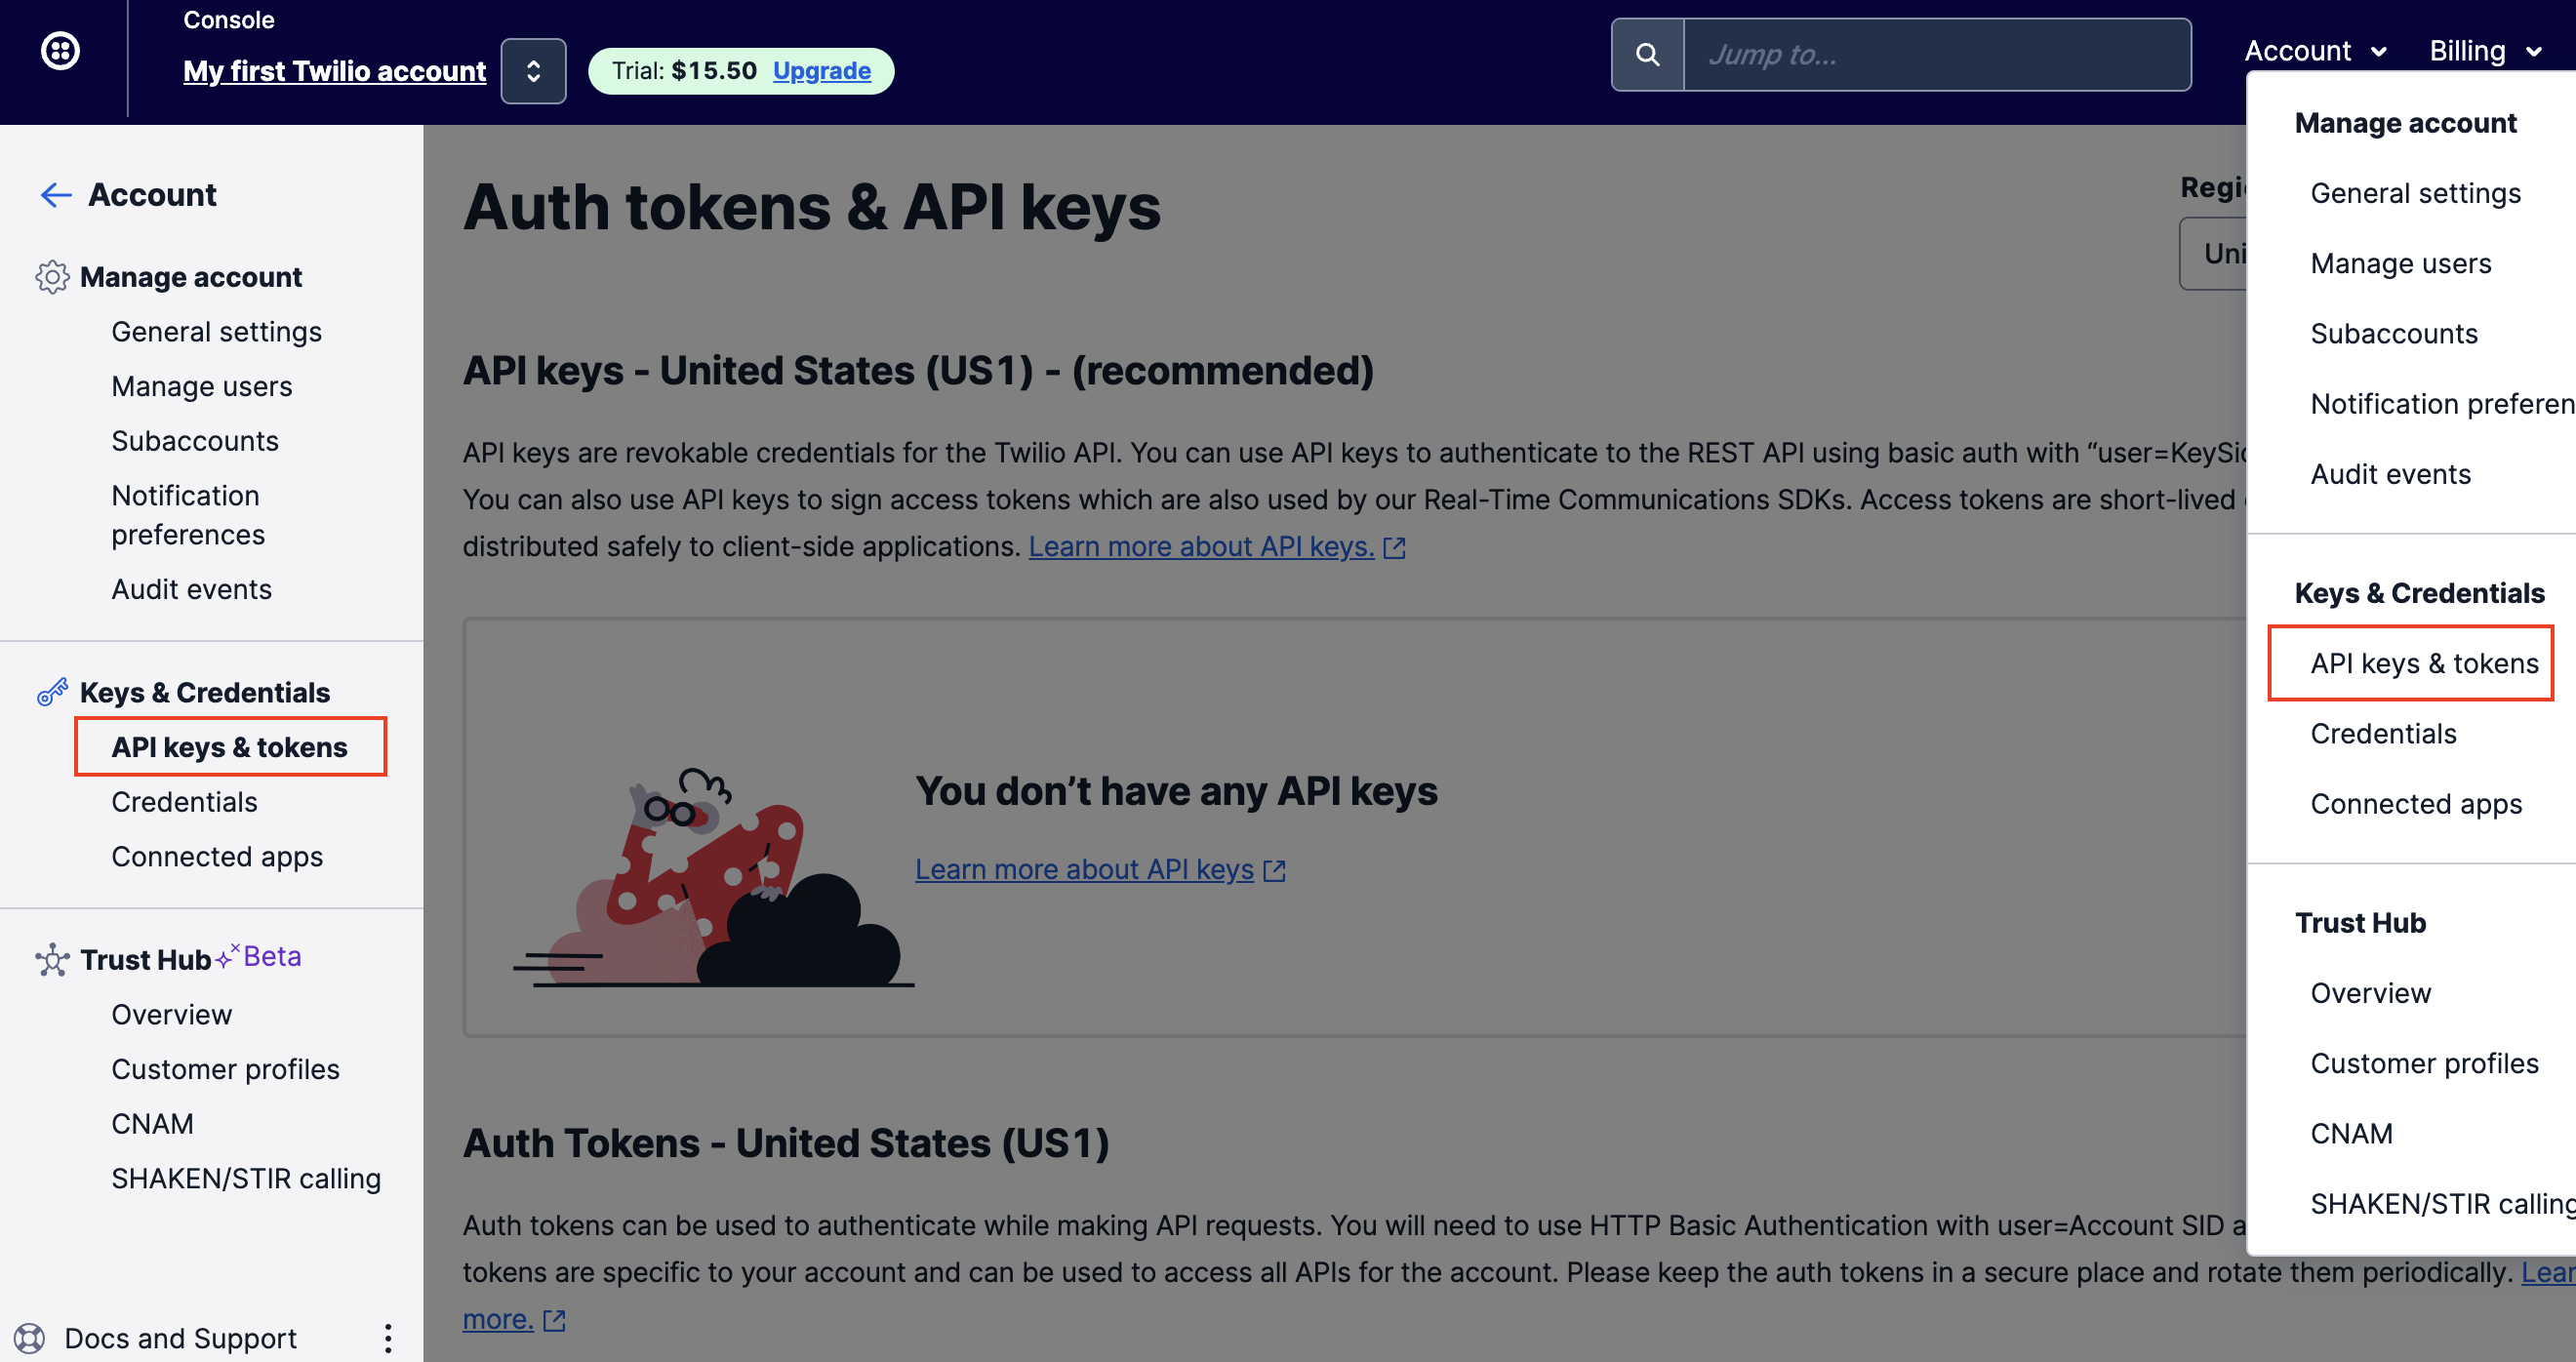
</p></figcaption></figure>

### 2. Your API key SID

To set up your API key for Postman, select **`API keys & tokens`** on the side dashboard under **Accounts**.

<figure><img src="https://4126954886-files.gitbook.io/~/files/v0/b/gitbook-x-prod.appspot.com/o/spaces%2F-MAQH3DF49Lq0AJudrbF%2Fuploads%2FOZxlWdp67CwNwr9Fxqwu%2Fimage.png?alt=media&#x26;token=f316ae4a-7f11-4c9e-a140-7bd471c29f3a" alt=""><figcaption><p>Select "API keys &#x26; tokens"</p></figcaption></figure>

Then, create a new **standard** API key by selecting `Create API key`.

<figure><img src="https://4126954886-files.gitbook.io/~/files/v0/b/gitbook-x-prod.appspot.com/o/spaces%2F-MAQH3DF49Lq0AJudrbF%2Fuploads%2FUEDO1ADwBJC0uKDMcw6S%2Fimage.png?alt=media&#x26;token=6274fd6c-e5f7-40ea-a6f2-cd9bac240d3c" alt=""><figcaption><p>Select "Create API key"</p></figcaption></figure>

Create a `friendly name` for your API key so you can easily identify it in the future, and select `Standard` as the API key type.

<figure><img src="https://4126954886-files.gitbook.io/~/files/v0/b/gitbook-x-prod.appspot.com/o/spaces%2F-MAQH3DF49Lq0AJudrbF%2Fuploads%2FaqNeRdKLQ4nqhmzHtKPH%2Fimage.png?alt=media&#x26;token=20f94651-b0fe-46e5-a4a2-05f32c7d1c9f" alt=""><figcaption><p>
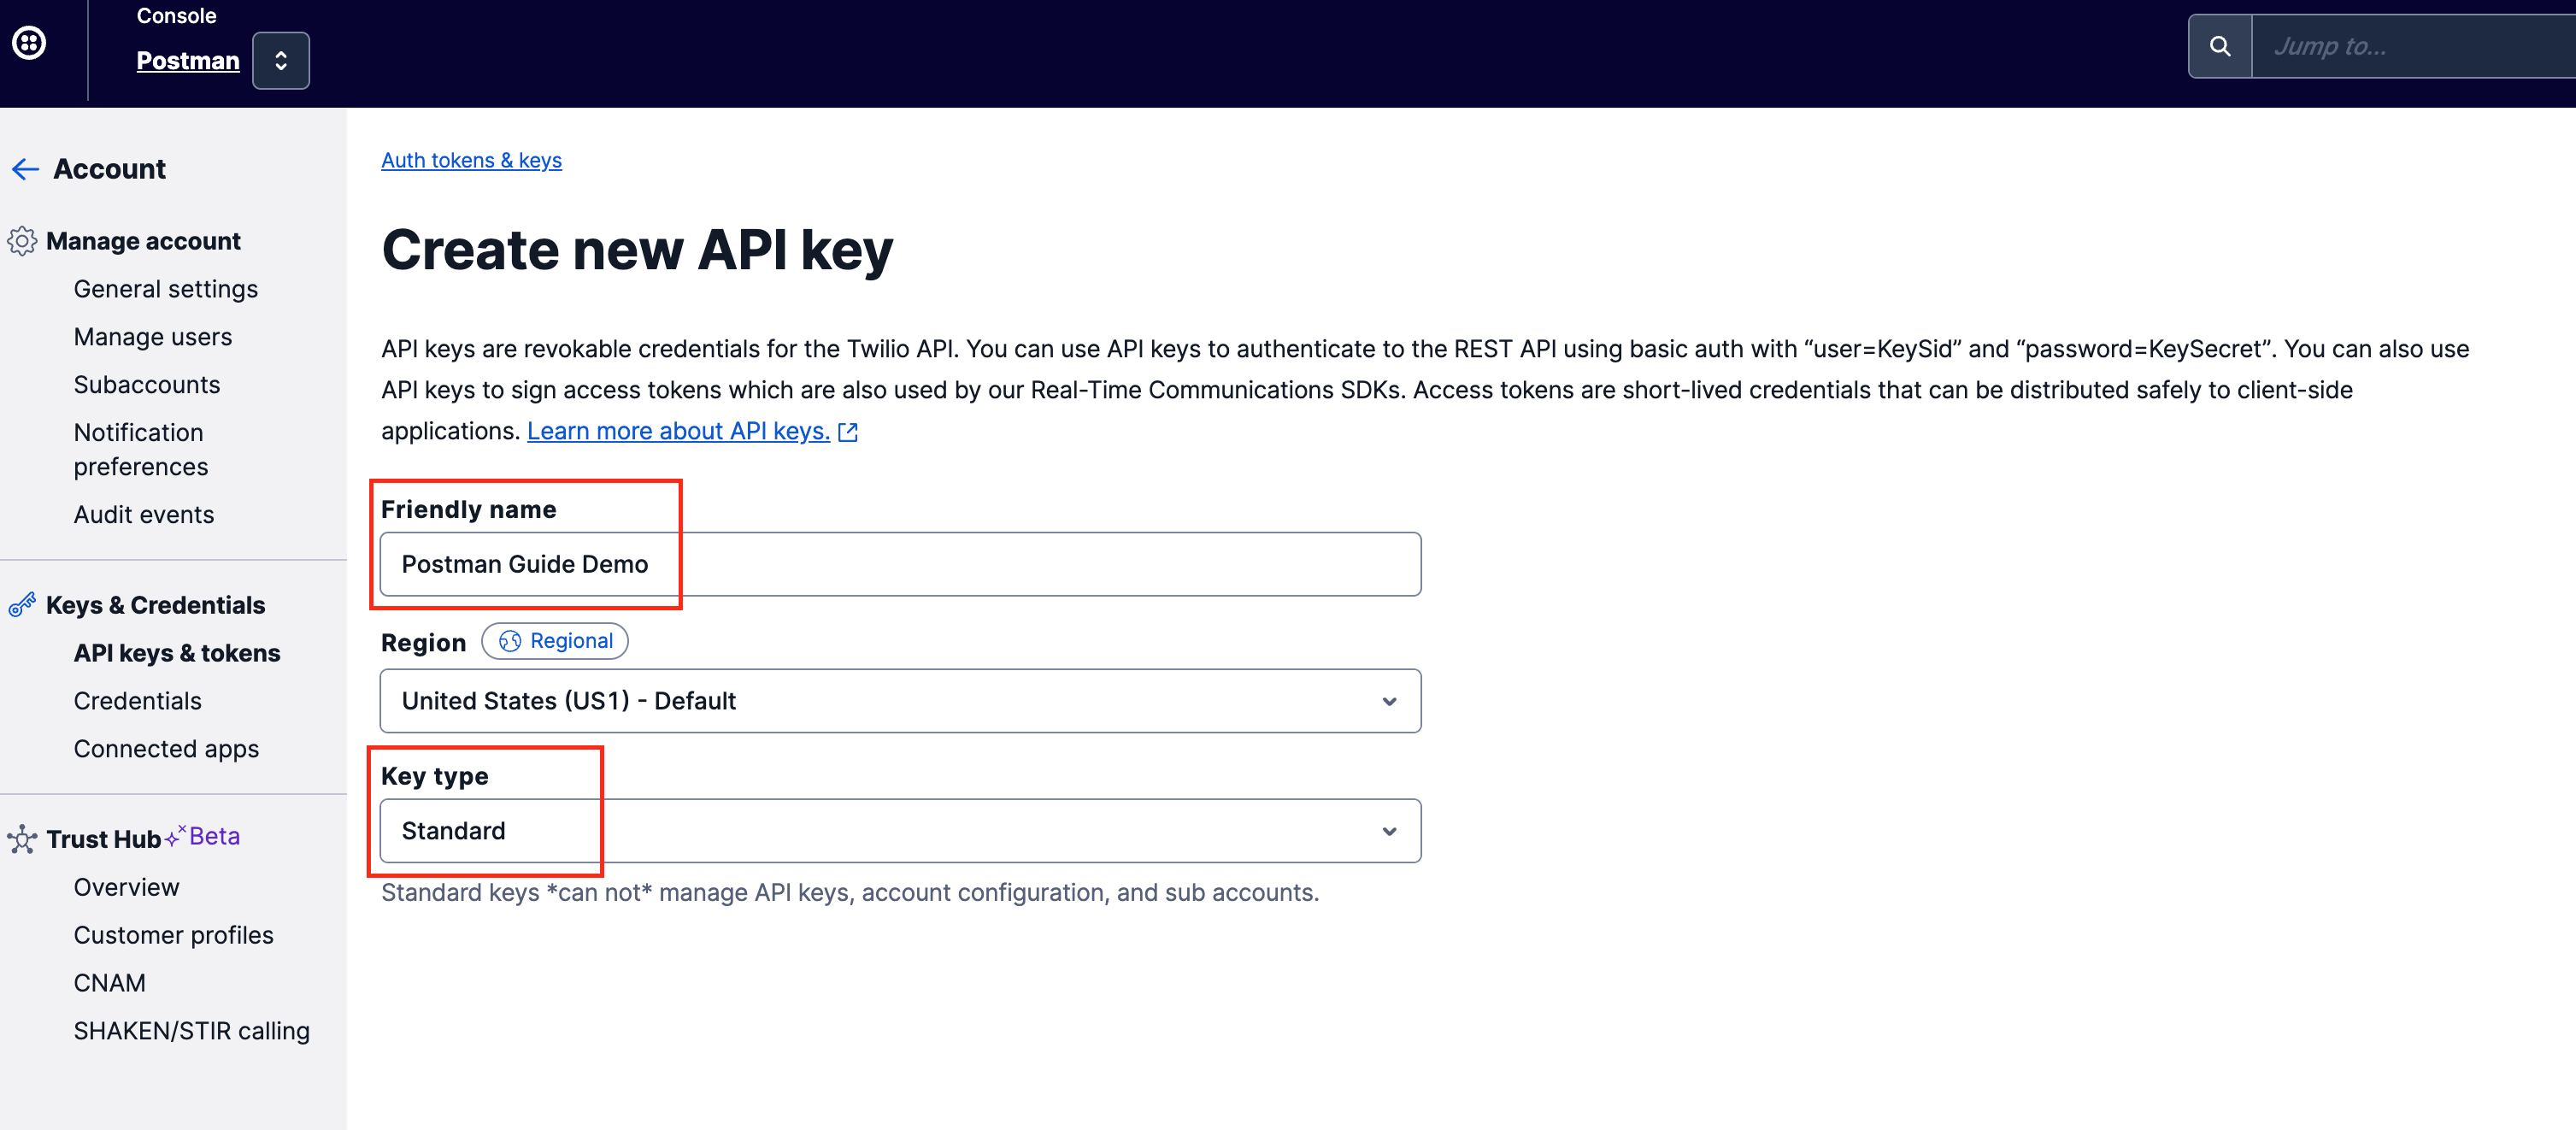
Name your API key, and set key type as "standard"</p></figcaption></figure>

### 3. Your Secret Key

Save your `secret key` - <mark style="color:red;">**remember, once you lose this or if you do not save it, you will NOT be able to retrieve it again after moving on to the next step!**</mark>

<figure><img src="https://4126954886-files.gitbook.io/~/files/v0/b/gitbook-x-prod.appspot.com/o/spaces%2F-MAQH3DF49Lq0AJudrbF%2Fuploads%2FcOstD7j0D6XZYMPEiRFM%2Fimage.png?alt=media&#x26;token=2ac573df-c375-4e08-b736-9406d6b7ad28" alt=""><figcaption><p>Save the API key SID and Secret Key somewhere safe!</p></figcaption></figure>

<mark style="color:red;">Make sure you copy and save these details somewhere safe.</mark> Then, check the box and click "DONE".

### 4. Your messaging service SID (without buying a phone number)

This is the last detail you need to save before proceeding to Postman.

{% hint style="info" %}
Note: we used to ask users to purchase a US phone number at USD$1.15. This will enable a one-way messaging ability (from you to recipient). With the implementation of the Sender ID regime by IMDA, this is no longer required - *only if you are sending ONLY to Singapore numbers.*

**However, if you are sending SMSes to foreign numbers,** you will still need to purchase a phone number. Otherwise, your messages will not be delivered. Find out how to purchase a phone number [here](https://postman-v1.guides.gov.sg/~/changes/YeLkNyuQOW0qmXU37t7T/campaign-guide-sms/onboarding-overview/step-4-configure-your-twilio-account/what-if-i-need-to-buy-a-phone-number), and follow these [steps](https://postman-v1.guides.gov.sg/~/changes/YeLkNyuQOW0qmXU37t7T/campaign-guide-sms/onboarding-overview/step-4-configure-your-twilio-account/what-if-i-need-to-buy-a-phone-number) to set up your messaging service ID. You can ignore the steps below if you are purchasing a phone number.
{% endhint %}

**If you don't have a need to purchase a phone number, follow these steps to obtain your messaging service SID.**

Go back to your Twilio home page, and select`Set up a Messaging Service`.

<figure><img src="https://4126954886-files.gitbook.io/~/files/v0/b/gitbook-x-prod.appspot.com/o/spaces%2F-MAQH3DF49Lq0AJudrbF%2Fuploads%2FfJq7Ng4RIhFLA6K7RI0H%2Fimage.png?alt=media&#x26;token=0f77e59b-3279-4c79-8ee9-47eb490c029a" alt=""><figcaption><p>
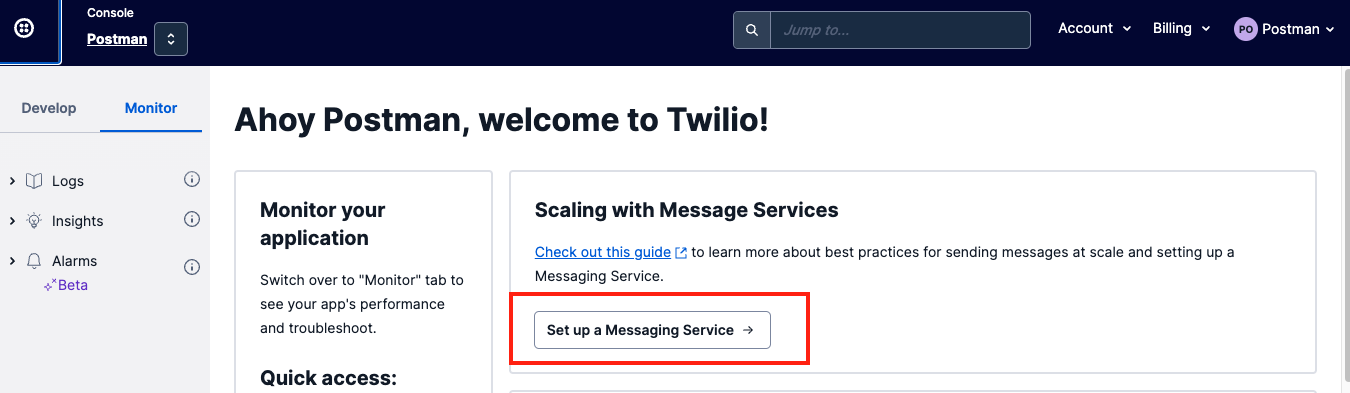
Click "Set up a Messaging Service"</p></figcaption></figure>

On the side bar, click `Develop > Messaging > Services > Create Messaging Service.`

<figure><img src="https://4126954886-files.gitbook.io/~/files/v0/b/gitbook-x-prod.appspot.com/o/spaces%2F-MAQH3DF49Lq0AJudrbF%2Fuploads%2FTQFQ29WAGeQMST00Keig%2Fimage.png?alt=media&#x26;token=77fabf39-8160-4965-a69e-d53864be360f" alt=""><figcaption><p>Create your messaging service</p></figcaption></figure>

Name your messaging service and indicate the purpose. This will help you better identify your use cases if you have multiple, and will also help Twilio detect your specific use case quicker should you need their help for troubleshooting.

<figure><img src="https://4126954886-files.gitbook.io/~/files/v0/b/gitbook-x-prod.appspot.com/o/spaces%2F-MAQH3DF49Lq0AJudrbF%2Fuploads%2Ff53SwXXYq7n9FNse6ONj%2Fimage.png?alt=media&#x26;token=2b1e7076-527c-4485-be07-9082ba8b7bf5" alt=""><figcaption><p>Fill in the required details</p></figcaption></figure>

#### Set up your alphanumeric Sender ID

Configure your alphanumeric Sender ID by selecting `Alpha Sender` under `Add Senders > Sender Type.`

<figure><img src="https://4126954886-files.gitbook.io/~/files/v0/b/gitbook-x-prod.appspot.com/o/spaces%2F-MAQH3DF49Lq0AJudrbF%2Fuploads%2FRzKs9ylDjgkxQZFd7mMq%2Fimage.png?alt=media&#x26;token=5ac6dafb-c9bd-448e-ab95-2c7f92c79004" alt=""><figcaption><p>
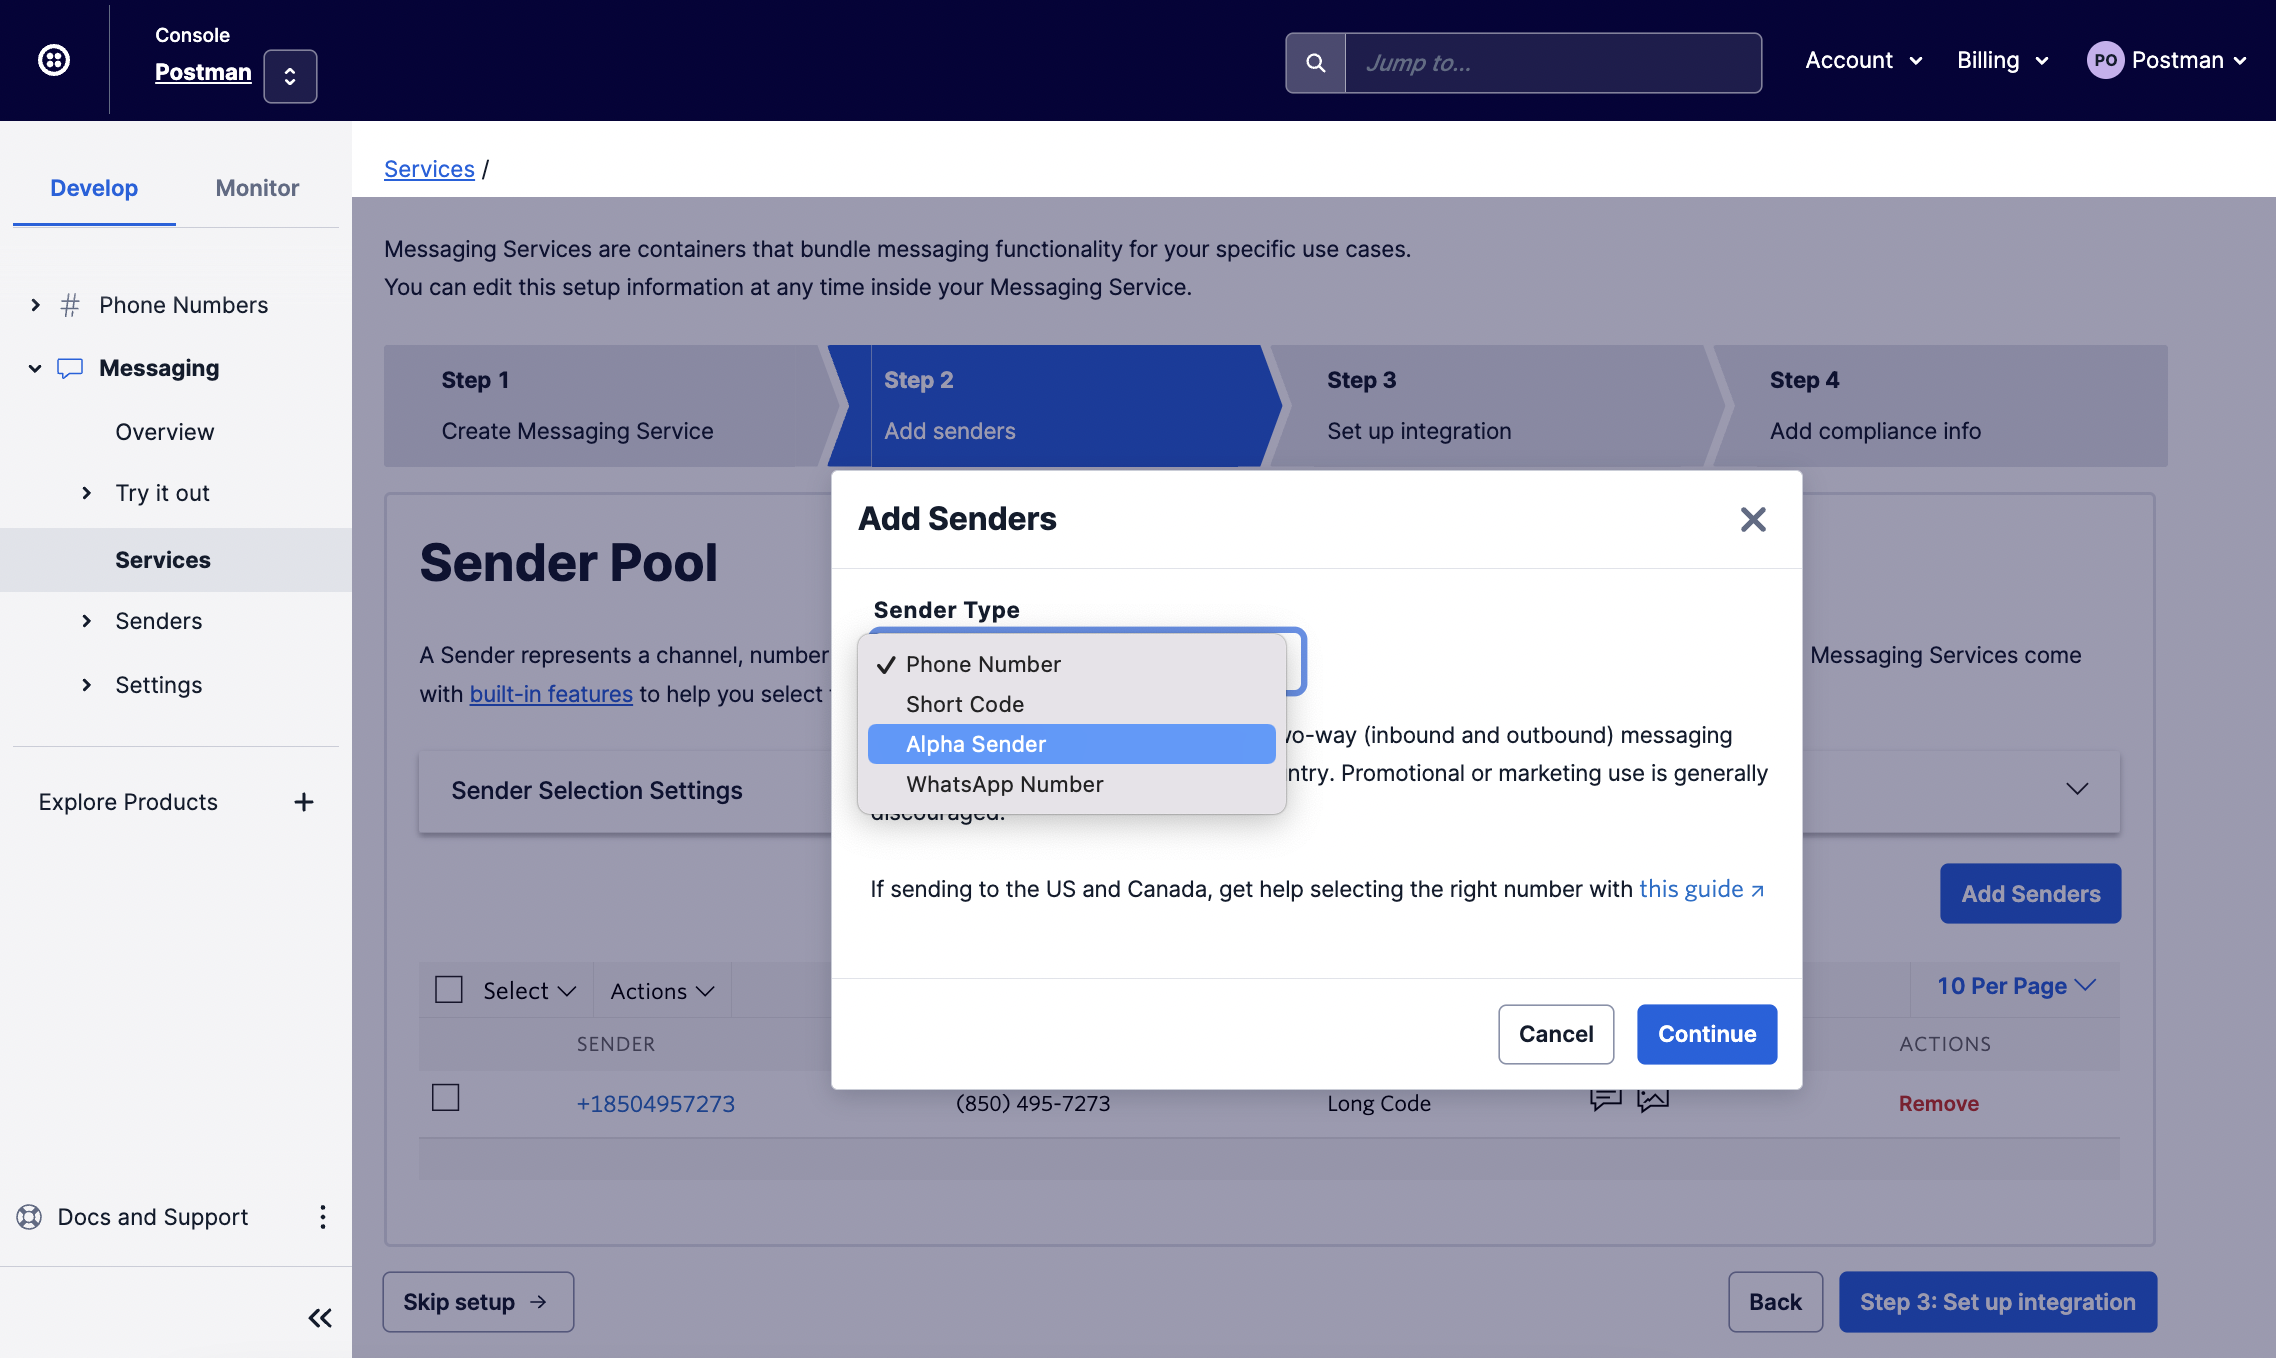
Select "Alpha Sender"</p></figcaption></figure>

Click Continue. *You may ignore the notification indicating that Alphanumeric Sender is not enabled for this account.*

<mark style="color:red;">**Specify the Alphanumeric Sender ID you want to use in the text box. It is best to align this with the Sender ID that you registered with SGNIC.**</mark>

<figure><img src="https://4126954886-files.gitbook.io/~/files/v0/b/gitbook-x-prod.appspot.com/o/spaces%2F-MAQH3DF49Lq0AJudrbF%2Fuploads%2F6YloyPlrnHN5tO9dmEzC%2Fimage.png?alt=media&#x26;token=f4ec3e7d-9c37-4d32-bddc-e5e8049c8b15" alt=""><figcaption><p>Add in your Sender ID
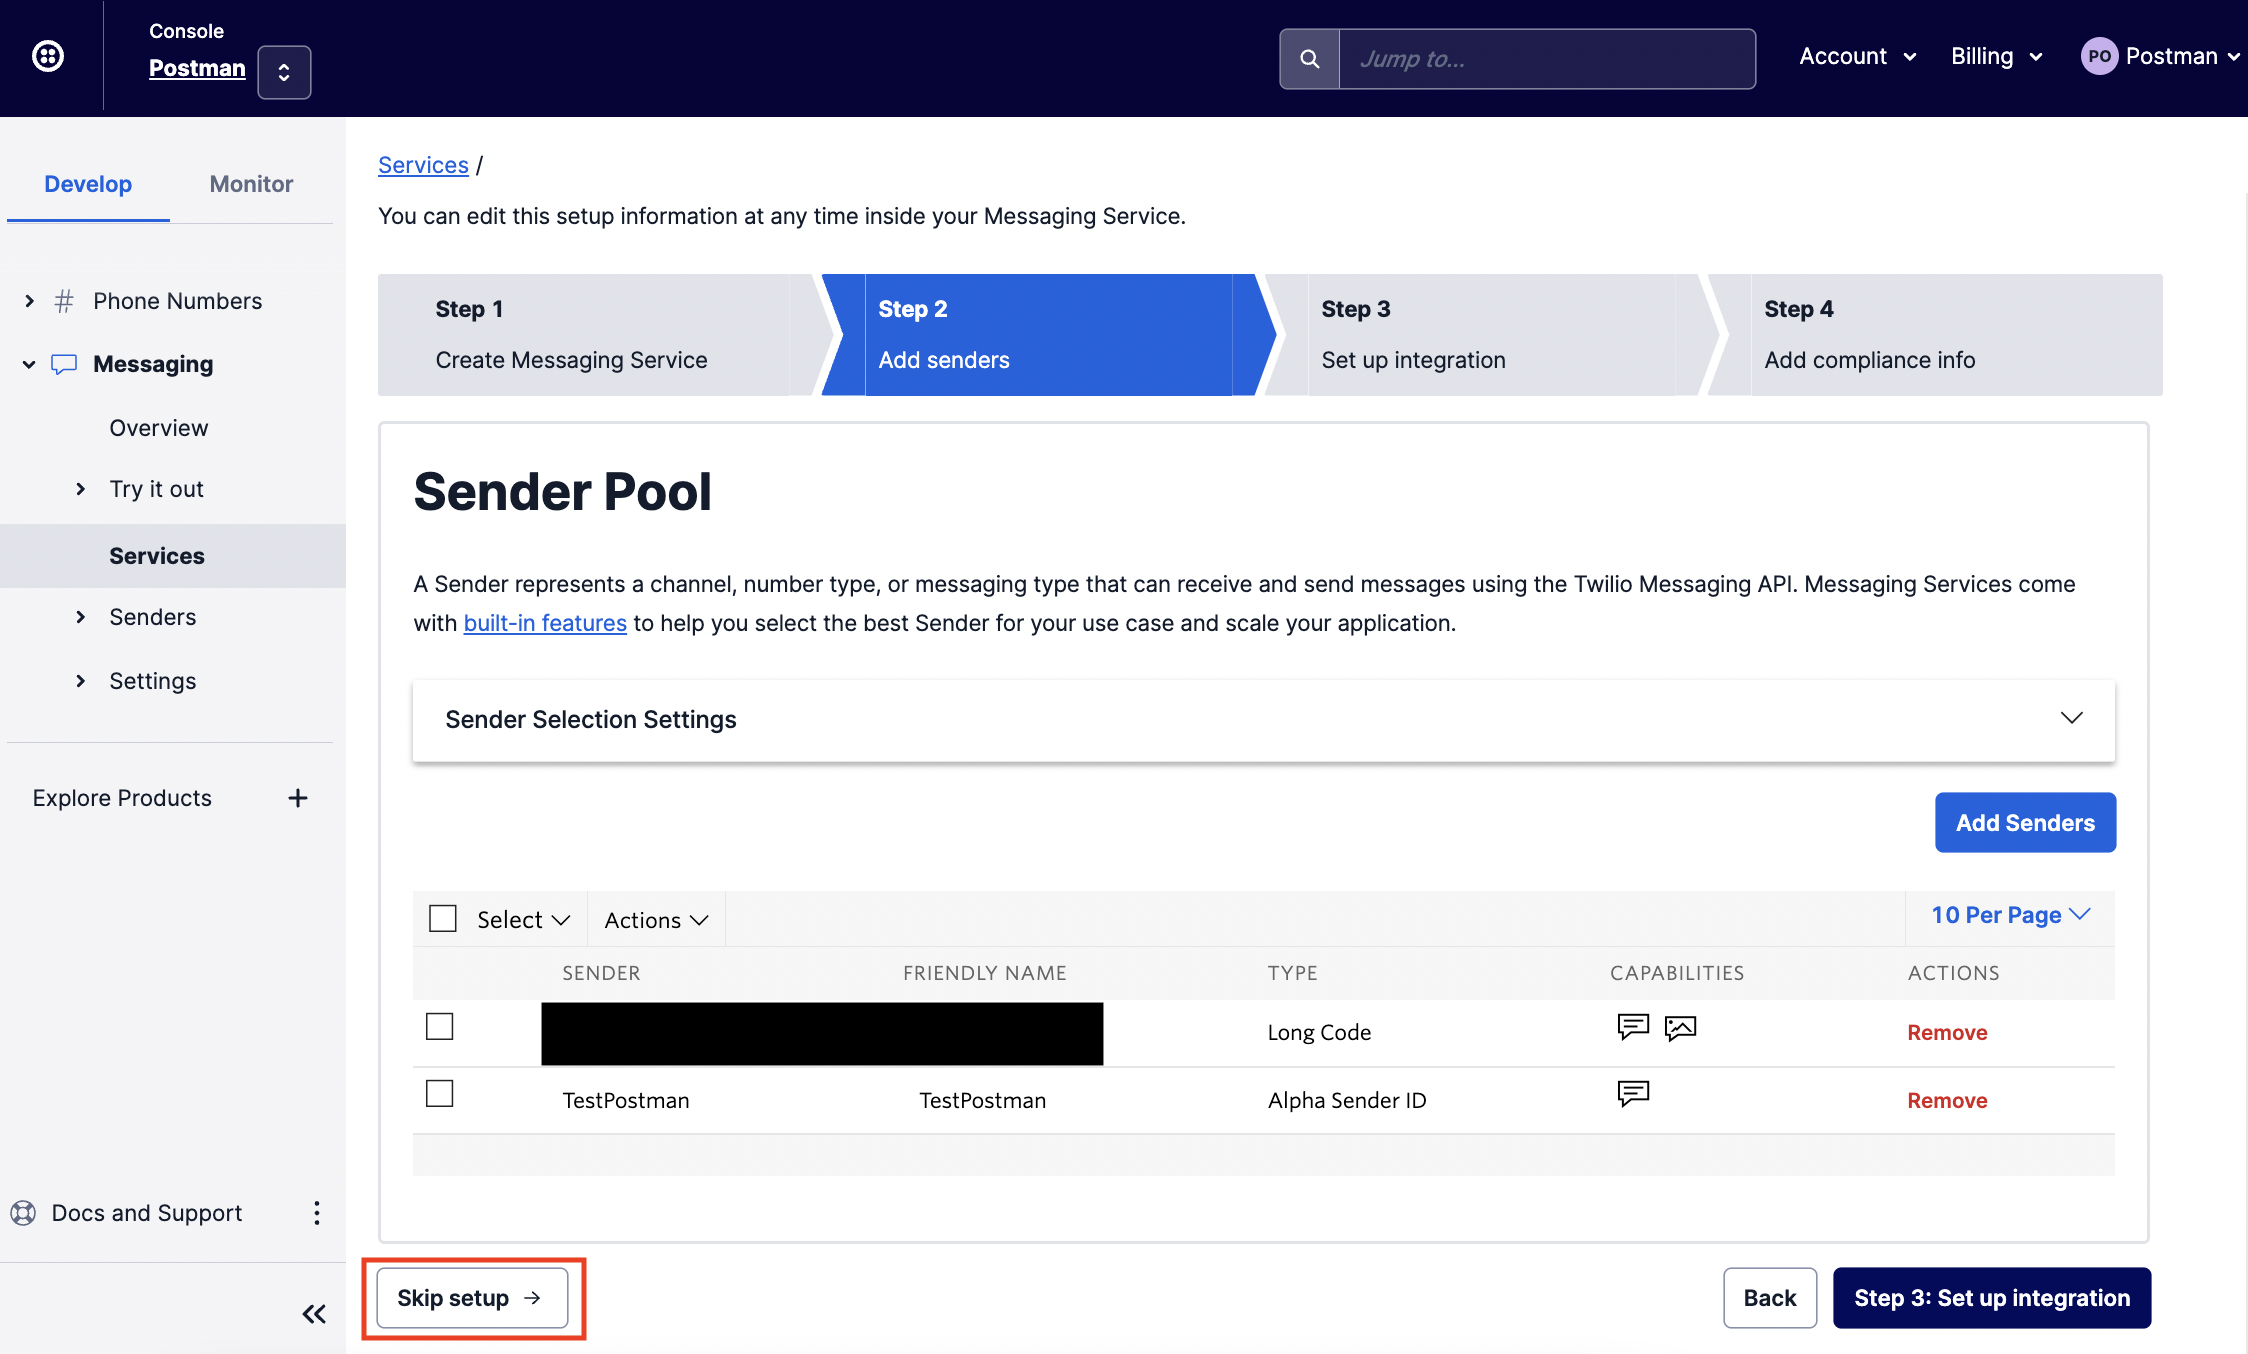
</p></figcaption></figure>

**If the Alphanumeric Sender ID you chose is protected,** you will notice either of the two things below.

* You encounter an error when setting it up on the Sender Pool page
* You may not receive any message when you send a test SMS

This also means that this Sender ID has been registered by another entity and you will not be able to use it.

Once you have completed the step above, you may click the `Skip Setup` button below.

<figure><img src="https://4126954886-files.gitbook.io/~/files/v0/b/gitbook-x-prod.appspot.com/o/spaces%2F-MAQH3DF49Lq0AJudrbF%2Fuploads%2FGPysfmxM1qZB9TGqJpeE%2Fimage.png?alt=media&#x26;token=b0c735c0-d299-4ff0-a206-9cb6ba675f0d" alt=""><figcaption><p>Complete the set up</p></figcaption></figure>

After clicking "Skip setup" in the step above, you should be brought to the Properties page of this Messaging Service. On this page, you should be able to find the **Messaging Service ID**.

<figure><img src="https://4126954886-files.gitbook.io/~/files/v0/b/gitbook-x-prod.appspot.com/o/spaces%2F-MAQH3DF49Lq0AJudrbF%2Fuploads%2FNNBgGOzx4jU5qLkQc76B%2Fimage.png?alt=media&#x26;token=49ea9b2d-b86b-4fae-b46d-4de4e6cec6cd" alt=""><figcaption><p>This is your messaging service SID</p></figcaption></figure>

#### Or, watch this video for a visual learning experience!

{% embed url="<https://youtu.be/Ez5pfGgmFEA>" %}
